Good afternoon everyone! 🙂
Well, the trimester is over, and I’ve already gone on holiday. I got into holiday mode very fast! I do want to do a quick wrap-up and reflection, however.
This trimester, I worked very hard to improve my skills in Unreal Engine 4. I had barely even used Unreal before, and by the end of this trimester, I had made constructed two scenes in it. I learnt so much about blueprints and setting up materials in particular. I also learnt how to use nDo and dDo to create my own PBR materials in Quixel Suite 2!
I still want to get better, though, and in the future, I would like to focus on improving my 3D modelling skills in general. I want to start sculpting, and I want to learn techniques for creating high-detail hard-surface models. I also want to explore many more modifiers in 3dsMax, because they can be so, so helpful!
Below are some resources that I will be using in the near future, to help improve my skills:
A Pinterest board I curated that is full of sculpting techniques/tutorials:
A Pinterest board I curated that is full of generic 3D modelling techniques:
And this is a Pluralsight tutorial to help me improve my character modelling (I’ve already started this one!):
My plan is to work on the Pluralsight tutorial over the break, and hopefully, my character modelling skills will greatly improve! I am excited to get into next trimester.
Thanks for reading,
In this post I am going to be deconstructing a shot from the film Stalker by Andrei Tarkovsky. I should have deconstructed this shot much earlier on in the trimester so that I could incorporate my findings into my worldbuilders/Ex Oblivione project, but better late than never, right?
For my worldbuilders project, I chose to create a 3D shot based off an excerpt from HP Lovecraft’s short story, Ex Oblivione. The excerpt was only half a sentence, but what a descriptive half-sentence it
“-I reached another world of purple twilight, iridescent arbours, and undying roses.”
Ex Oblivione is the tale of a man who embarks on a dream-journey leading up to a peaceful and willing death. Eerie, no? Since Andrei Tarkovsky is well-known for metaphysical themes and shots of immense beauty and meaning, I believe that he aligns very closely to HP Lovecraft, creatively. Though they used different mediums, the genre and feel of the tales that they told had many shared aspects.
Here is my original concept art:
And here is the final shot (part of my showreel, scrub through to 00:45 to see the shot):
I ditched the bright colours and went with a much eerier look in the end. Having made this decision, I think that the shot from Stalker that I am going to show you below suits the theme of my shot quite well.
The shot I am analysing goes from approximately 04:30 to 05:00.
The camera slowly moves through the scene, through faint rings of golden light, brief breaks in the darkness of the tunnel. Hanging cobwebs (or vines/roots) catch the golden light and add to the composition of the shot by leading the eye deeper into the tunnel. The slow camera movement leads to suspicion and a sense of caution being ignited within the viewer, and coupled with the heavy use of dark colour this creates quite an unsettling scene.
Some film tropes are understood internationally and are not specific to the film’s country of origin. Tarkovsky was not a stranger to foreign films and drew inspiration from many cultures when creating his works.
Tarkovsky has made excellent use of colour, pacing and composition in this shot in order to evoke feelings of uncertainty, concern and anxiety within the viewer. The composition of the shot (which is quite a lengthy, continuous shot) continuously draws the viewers eyes toward the figure standing furthest away, almost entirely fading into the darkness of the tunnel.
My shot for Ex Oblivione has a familiar composition with a tunnel of spiralling tree trunks. The camera movement is also quite similar and I attempted to cause the viewer to experience a sense of wonder, while also giving the shot an unsettling vibe. Much like Tarkovsky, my final shot made use of negative space (created by fog) which I believe is quite useful when trying to make people feel uncomfortable. Humans are naturally social creatures, and when we strip compositions down and utilise vast amounts of negative space, we can be left with a chilling and desolate scene. Nobody wants to be alone, and much less so in a dark place with such a muted and somewhat depressing colour palette.
Throughout Stalker Tarkovsky makes the viewer wonder if everything is happen in a dream. Although the film never comes to that conclusion itself, fans speculate that it did indeed all take place inside a dream. Tarkovsky uses dull colours (in stark contrast to a select few bright scenes) and fog to suggest this.
Though I did not deconstruct this shot prior to assembling my scene, I have certainly learned much from this research about cinema and techniques for evoking different emotions within viewers. I would like to try my hand at creating a pure, Tarkovsky inspired shot in the future and know that this research will be invaluable.
For my cross-discipline this trimester, I decided to work on a studio 3 mobile game project called ‘Served Cold’. Served Cold is a 2D puzzle game and is available for download on the google play store.
Here’s everything that I have created for Served Cold:
So many tiles!! I had to create Autumn and Spring inspired tiles for the game, one character (animated through sprites) and a teleporter sprite sheet. I gotta say, the amount of times I had to save out variants of the same psd file was insane!
I’m very used to working on games projects and accustomed to their workflow. The workflow for this project was pretty basic, I wait to be told what assets are needed, I create them, and then I save them in various formats with succinct and well organised naming conventions. For this project, they needed everything to be provided as pngs, so that is what I did. However for posterity, I always provide the people I am creating content file with a ‘master file’, be is a psd, max file, aep file, etc.
Once my assets were completed, I was to upload them to a google drive folder dedicated to the project and inform my team mates of their completion via Slack. Though most communication for this project was done in person, Slack supported our communication whenever we were not on campus together, and google drive handled submission and version control.
I enjoyed working on this project and always have a tonne of fun working on games projects. I have to say, I find working on games discipline projects is ‘my thing’, and I am so, so thrilled that I get to do it all of next trimester.
Today I’d like to post a blog about my research on lighting 3D environments, specifically within Unreal engine as that is where I am doing the bulk of my environmental work recently.
Lighting is about controlling light, shadows, reflections, refractions and colours. In our day-to-day lives, we may not give lighting much thought. The lighting of a physical room that we are in, a film shot, or how the lighting of our bathroom affects how pretty we think we are, ultimately goes over our heads. Our subconscious mind, however, is busy reading the scene and directing our thoughts and emotions to react accordingly.
For example, when we play a video game, every aspect of the lighting and colour has been consciously crafted by a lighting artist. It is not just a fluke that each individual shot (if composed by a knowledgeable and talented artist) adds to a cohesive, emotional experience. The lighting of the scene tells a story in itself.
Telling stories with lighting
The shot above is a still from the video game Portal 2 by Valve software. The composition of this shot makes use of physical shapes and forms well, but without clever use of lighting, the player would be left without a true sense of the ‘feel’ of the scene. GlaDOS (the intimidating robot hanging from the ceiling) is a menacing and cruel character. The use of a blindingly bright light source behind GlaDOS casts her in a dark shadow, illuminated only by harsh rim-lighting and the glow of her haunting eye. This clever use of light and colour communicates to the player that they should be unsettled by the scene, that there is something dark to occur soon within the narrative.
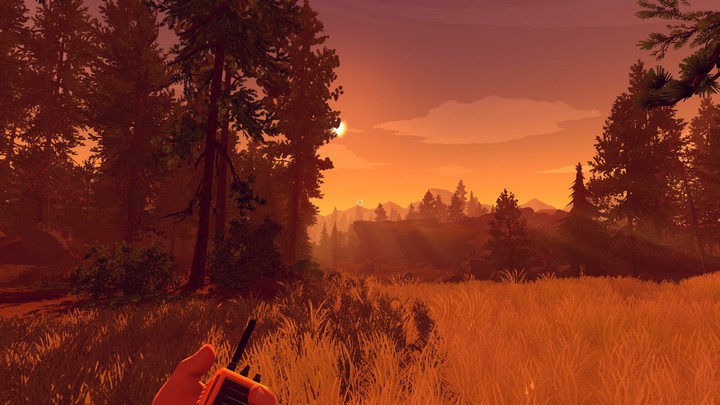
I’m sorry for continually plugging Campo Santo’s Firewatch, but it really is just amazing when it comes to atmospheric lighting. The brightly lit and over-saturated grass is beautiful but also reminds the player that at any moment, the entire Shoshone National Forest could go up in flames from being too dry. This whole game takes place inside a tinder-box and leaves you on the edge of your seat because the harsh, red lighting won’t let you forget how delicate the environment really is. The use of dusk lighting in this shot adds a sense of ending and loneliness as you wander through the forest alone.
Speaking of dusk lighting, that brings me to my next point.
Lighting basics: Manipulating lighting to indicate time of day
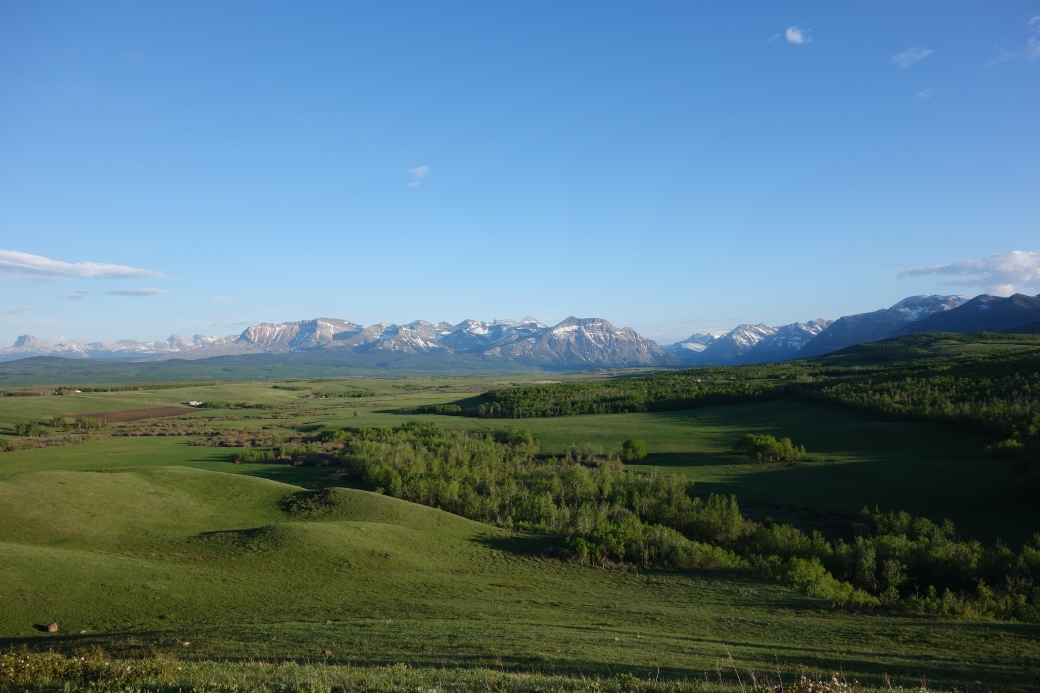
When lighting a scene it is important not to forget above the clever usage of the absence of light – shadows. Every time you place a light in your scene to illuminate something, a shadow will consequently be cast. Shadows give viewers just as much important visual information as light sources themselves, so it is important to understand how they work and how to utilize them. To communicate this, I will be deconstructing the two images below, one taken around noon, and one at dusk.
This shot midday shot is full of bright, cool, crisp colours. Due to the bright illumination of the scene, dark shadows are being cast. Shadows at noon are intense and short (due to the sun being directly above the environment) with harsh edges and are very, very dark in contrast to the rest of the scene.
This dusk shot is full of highly-saturated colours with dark values. Shadows are elongated and soft, overlapping to create different levels of shadow, though remaining quite soft even in overlapping areas. The low angle of the light source (the sun) causes gold hues to flood the scene (due to the sun’s colour being amplified through our atmosphere) and also causes shadows to lengthen.
Different kinds of lights / Three Point Lighting
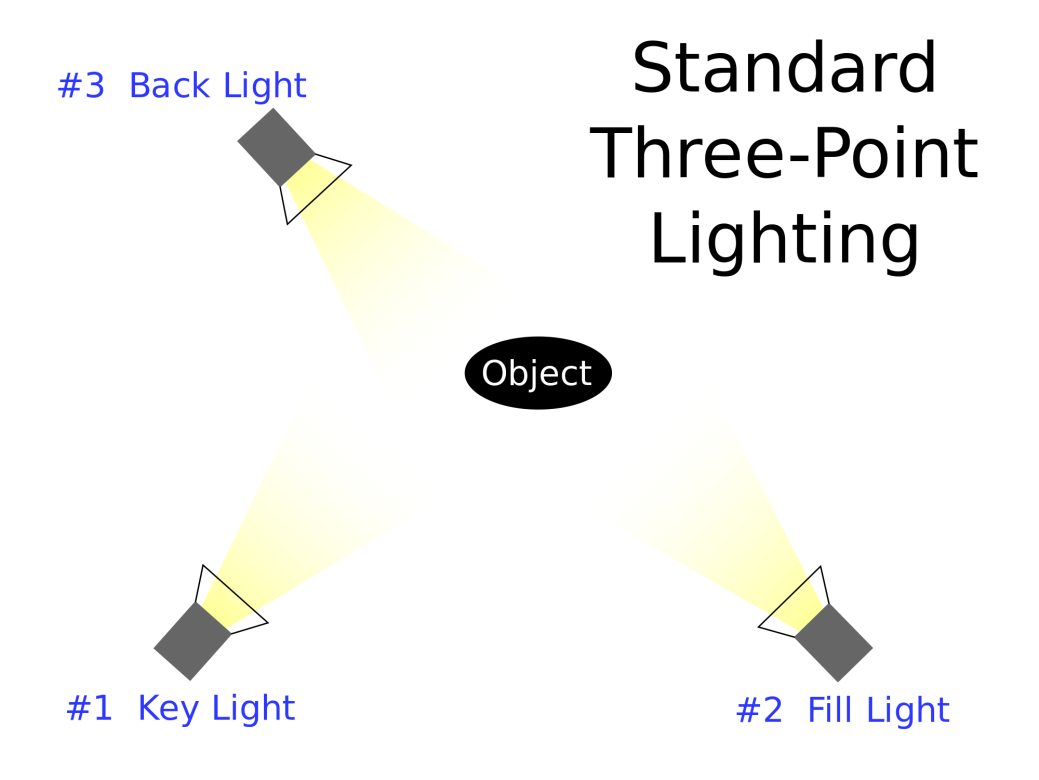
Using a three-point lighting setup is an efficient method of lighting an asset and is especially useful when rendering model turnarounds (but is useful in most other circumstances as well).
Key Lights
A key light is the strongest light source and illuminates most of the scene/objects, casting strong shadows.Key lights should be placed front and center, slightly above your mesh and tilted so that the light rays shine diagonally down onto your character/scene, at an angle of roughly 45 degrees.
Back/Rim lights
A rim light is used if there is not enough contrast between the object of interest and it’s background. A rim light has a softer intensity than a key light and should be placed behind the object of interest at a slight angle.
Fill Lights
A fill light serves as an ambient light to rid the scene of pure black, or any shadows that are too harsh. Fill lights will always be at a much lower intensity than key lights and will ‘disperse’ light rather than casting hard shadows like the key light. Should be placed at the front of your object, ideally in such a way that the shadows cast by your key light are being somewhat counteracted.
How I have used three point lighting in my practice this trimester:
I am finishing this blog post well over a month after I started it, and though I would have wanted to implement a good lighting setup in my unreal scene, for one reason or another it just didn’t get done. However, I am extending my work on my specialisation into next trimester and will implement the things I have learned from this research then.
I am also going to do some renders of individual assets I created this trimester using a three-point lighting setup as I want to flesh out my showreel with some well-presented work! 🙂
Get ready for a massive blog post, because my project wrap-ups are always HUGE.
As you all know, I had been working on a project for the last 8 weeks called ‘Ex Oblivione’. Ex Oblivione was a short story (only a page long) written by HP Lovecraft. The story takes the reader on a journey through a beautiful dream land and ultimately the protagonist dies peacefully in his dream. It is a surreal and haunting read, but also beautiful and peaceful. If you’d like to read the story in order to gain more context as I explain this project, you can check it out here.
My team’s goal was to take this stimulus and respond to it by creating a series of shots in a real-time engine, that corresponded to parts of the text. My shot was based off the following excerpt:
“Once when the gentle rain fell I glided in a barge down a sunless stream under the earth till I reached another world of purple twilight, iridescent arbors, and undying roses.”
The bold text is what I used to inspire my shot, and honestly I think I achieved something pretty cool. Watch the final video below (the first shot, the pinky-purple one, is mine).
Sorry for the somewhat low quality, YouTube seems to have compressed it like crazy and I’m not sure why. Oh well! You get the idea :).
Obviously I took some creative liberties, I added glowing mushrooms to the scene and the arbors are made of curled-over tree trunks rather than the roses themselves, but I think it looks quite charming and magical. LO 01 + LO 02: Critically reflect on how you (and your team as appropriate) have performed in relation to your behavior, the processes you employed, and the outcome of the project(s). Effectively reflect on topics related to your discipline and your craft and how you (or your team) have performed in relation to these.
Okay, now let’s get honest. This project was very hard for me to sink my teeth into. With my final project starting up, I found myself constantly distracted from getting any work done for this project. I think that a lot of my peers were in the same boat, and that our productivity took a hit because of that fact.
Honestly, with the amount of time we were given (eight weeks) and a budget of at least 20 hours of studio work each week, you would have expected much more. We should have expected more of ourselves. I was unmotivated and sluggish during this project, but I still learnt a few new tricks that I’m happy to say i will totally be using them again in future projects.
In regards to the processes I employed, my pipeline was much the same as it always is. I followed a strict PBR asset creation pipeline and even learnt how to create my own PBR materials for use in Quixel with the help of tools like NDO and DDO. I’ve also finally gotten my head around normal maps, both how to create them, and how to utilize them well. I learnt the basics of sub-surface scattering (which, as a lover of foliage, I am super excited about) and I learnt how to animate cameras (and tweak their post-processing settings) in Unreal Engine 4.12.
I’m happy with the final outcome of this project. I think it’s pointless to say “it could be better”, as everything can always be better if it is given the time and dedication. But right now, I think this project is a good demonstration of my skills and has helped me to become more confident in my current skill set and work practices.
LO 03: Investigate and effectively implement project management processes as guided by industry practices.
I’ve talked about this on my blog so many times now that I’m not going to give this one a huge amount of my time, this will be quick.
Industry project management must be filled with communication and constant check ups with all team members, or at least any team members that your work has a dependency upon. For this project, we used a Slack channel and Google Drive. Slack was used as a way for us to give and receive constant updates, where as Google Drive was an easily accessible place for us to store our work, greatly minimizing the chance of data loss.
Here is our Slack channel:
And Here is our Google Drive:
LO 04: Execute a project in accordance with a project plan.
This is our project plan (note: you will only be able to access that link with an SAE email address, sorry!). The only way in which we did not stick to that plan was some aspects of the production timeline. The project was ultimately extended by a week and this contributed to our timeline being a little bit messed up, but even without that extra week being added, we were already dropping the ball on the ‘ getting things done on time’ aspect of the project.
All of our deliverables, what was in scope and what was out of scope, software being used and work processes/pipelines stayed exactly the same as planned.
LO 05: Produce outputs that successfully meet the brief set by the facilitator(s).
In teams of 4-5 members, students will be creating a World Concept Teaser that is based on a description from a Novel.
Similarly to a “Look Book”, the teaser needs to illustrate the visual style and mood of the World. However, students are required to fully develop an environment – including effects, lighting and animation – and reveal the environment in an intriguing way that suits the mood/theme of the Novel. Students should find examples of shots from existing films that demonstrate the mood that they want create.
Each team member is responsible for creating one shot (minimum) for the teaser.
Students need to find an scene from a book that is vividly described, evoking a specific atmosphere and mood. Below are some examples of Writers/Novels that have great, evocative language:
“The Fall of the House of Usher” by Edgar Allen Poe
“Do Androids Dream of Electric Sheep?” – Philip.K.Dick
“Journey to the Centre of the Earth” / “20,000 Leagues Under the Sea” – Jules Verne
“7 Eves”/ “Snow Crash” – Neal Stephenson
H.P.Lovecraft
Lewis Carroll
Student can choose to create their environment in one of the following three mediums:
Environment in a Real Time Engine
“VFX” shot – Matte Painting/Virtual Environment, which might use camera mapping techniques
2D Animation, in 2.5D
Constraints:
Students can find their own novel excerpt.
Modular workflows must be used in the process of creating the environment
Students should avoid scenes from novels that have a lot of character animation, but characters can appear in the Teaser.
I have put everything that our team did in this project in bold, and I can tell that we successfully met all of the requirements of this brief. We also submitted all key deliverables.
LO 07: Develop and sustain effective teamwork skills.
I think the biggest demonstration of teamwork throughout this project was the creation of modular assets that we all shared. For example, I used fungus that Kate created in my scene, Curtis created vines for other team members to use in their shots, I provided (I didn’t make them however, I just found them) some cool PBR bark materials, etc. There was a lot more cross-over between team members and a lot of us pitched in in some way to help with another member’s shot. That was my favorite part of this project, in a teamwork sense. Creating models always feels better when you know it’s not going to be used just once.
On top of that, we also had meetings in our own time where we would discuss our intentions for the project, what we were currently working on, and provided feedback for others. This constant communication and constructive criticism is good for team morale and kept us plodding along happily. When we weren’t physically together, our teamwork was sustained through the use of Slack, so that we could communicate whenever we needed to.
LO 08: Effectively communicate what your intentions are for your project.
Again, I think our project plan covered this pretty well, but in addition to that we also had an art bible. Our art bible really got into the details of how we envisioned the final product from the get-go.
LO 09: Demonstrate effective publishing techniques appropriate to the audience and creative intent.
I published the final work here on YouTube. Making use of tags such as #UE4, #realtimeenvironment and #3dmodelling, I attempted to draw in an audience that would be specifically interested in the work. I think YouTube is one of the best places to publish an animation (I chose it as all of my current work is on there and my showreels), but Vimeo is a great place for professional creative works as well and I want to make an account for future use.
ANM230.LO01: Plan and implement large-scale projects, incorporating robust modelling workflows.
I’ve shown all of the project planning above, and while I have briefly touched on the modelling workflows, I’ll add a little more here.
My workflow for this project went like this:
concept art/reference gathering
creation of meshes
unwrapping meshes
creating material ID maps, normal maps
creating PBR materials in NDO and DDO
Placing meshes in final position in-engine
Setting up materials in-engine
Lighting set up and baking
Camera animation and post-processing
Final render
ANM230.LO02: Engage in projects involving key stakeholders.
The key stakeholders for this project were our facilitators, Steve and Katie, and of course all team members. The reason that we were stakeholders in this project is because we needed the project to succeed in order to have a great portfolio piece.
ANM230.LO06: Reflect on the roles in the modelling production process.
I suppose this is a good time to reflect on my modelling pipeline in more detail than what I have outlined above.
Concept art:
I find it funny how when I began this course, concept art was all that I wanted to do, and now I tend to neglect it. I rush to get through pre-production so that I can throw myself into modelling, and sometimes the final quality of my work can suffer from this. Without a clear and well thought-out plan of where you’re going with your work, how are you ever going to get there? I need to spend more time and energy on this stage of the pipeline and reconnect with my old love for it.
Creation of meshes:
This is a part that I love and will put a lot of effort into. Every day I get faster when using 3DS Max and I am proud to say that I am 100% more enthusiastic about 3D modelling than I was at the beginning of this course. My pipeline can include the creation of a high poly mesh to bake down onto a low poly mesh, but it does not always need to be done. Something that I have failed to utilise so far when creating models is sculpting techniques. I’ll admit, I’m a little bit concerned by the thought of retopologising things and am much happier just doing it well by hand. But, I need to push myself to try new things, and so I shall in my next project. Luckily the thing that I will be sculpting does not need to deform, so topology won’t be a huge concern.
Unwrapping meshes:
I am so, so, so much better at this now that I was this time last year. While I once hated unwrapping, I know love doing it and find it oddly therapeutic. The pelt and quick peel tools are my favorites!
Creating material ID maps, normal maps, AO maps, etc:
Another thing that I used to suck at is baking maps in 3DS Max. Now I am confident in my ability to use the ‘render to texture’ function and know my way around all of the settings.
Creating PBR materials in NDO and DDO:
Before this project, I had never even thought of trying to create my own material, let alone a PBR material! But as it turns out, I have an affinity for it (meaning I enjoy it a lot, not that I’m a material-creating-goddess) and actually love fiddling with all of the settings in NDO’s map creators in order to create the perfect material for whatever I need to texture. First I take my diffuse texture into NDO, create a normal map from it and bake AO, specular and gloss as well. Then I take those into DDO and generate my own custom material. Voila!
Above: A rose petal material I created.
Lighting:
Lighting is something I enjoy less and subsequently I have spent less time researching it. I really don’t know what I’m doing when I’m lighting a scene, and this can let me down, stopping me from being able to show my work off as well as I possibly could. This is definitely an area of my practice that requires a lot of time and dedication in my next project, I’ve already put time aside for it.
Final render:
Not a whole lot to say about rendering other than I am much more comfortable in the ‘ render setup’ window than I was a year ago. The countless settings no longer intimidate me and I am finding it easier and easier to achieve my desired results.
Overall, I enjoyed this project, learnt a lot, showed off my skills, and I am very proud of how far I have come. I’m looking forward to seeing how much I have grown by the next time I write a post-mortem :).
Thanks for reading guys,
Sorry for being quiet for the last few days, it has been quite a busy week. Anyway, today I would like to discuss some research that I have done on organic modelling and sculpting techniques, so let’s jump in!
What is organic modelling?
Organic modelling is the opposite of hard-surface modelling. Hard-surface models include man-made things like architecture, cars, pillars, technology, machinery. Anything with a smooth and solid surface, with well-defined, sharp edges, can generally be considered a hard-surface model. Organic modelling is anything with a loose or flowing, natural form. For example, trees, landscapes, creatures,characters, foliage, and rocks in their natural states.
What is sculpting?
Sculpting is technically also a 3D modelling technique, but there are some key differences. Sculpting programs like ZBrush or Mudbox allow the artist to work with ‘clay’ like they would in real life. In Max or Maya, you are restricted to manipulating vertices and polygons. While you are technically doing the same thing when sculpting, the focus is away from topology. The artist will push and pull at the sculpt, creating smooth, organic, flowing surfaces. This is particularly handy for muscle definition.
On the left: a sculpted bull.
On the right: a modelled bull.
You can certainly tell the difference between those two bulls!
“Sculpting looks so much better! Why would anyone ever use polygon modelling in their pipeline?”
As this is a research blog, I’m going to use that question as a prompt for some link-dumping.
In the link above, CG Society user InfernalDarkness responds to that very same question:
“The root of the answer comes down to two main factors, both of them being based around animation, as opposed to still renders of objects (sculptures) that never move. It’s about topology, and how the model will deform when attached to a character rig.
Poor topology means your mesh will not animate predictably and important techniques like facial animation, expressions, and even simple movements will fall apart or look horrible, or bend and stretch in ways you don’t want. You can’t just rig up a model and go to town with it and expect to have decent results.
Topology is also very important when texturing. But modern tools like Zbrush and Mudbox work in conjunction with Photoshop instead of against it (BodyPaint) much easier, these days. And you can retopologize characters in these types of sculpting programs now with decent results too.
But to make a long story short, if you’re not animating, it doesn’t matter how you sculpt. You can use as many polys as you want. You don’t even need a displacement map if you have a decent workstation; I often use full high-poly models straight from Mudbox.
But if you’re animating, you need to know low-poly techniques if you want your models to ever be usable. Sculpted animation (displacement maps) is then possible, but your model needs to “work” first. Rigging up a high-poly model is not only ridiculous but very anti-productive in an animation pipeline – you want your animators to have a simple rig they can use on ANY workstation, really. Even a laptop. This means you need a nice low-poly model too, generally.”
Basically, high-poly sculpts with crazy amounts of unpredictable topology can be a real pain in the ass. New technologies like Topogun allow sculpters to retopologise their sculpts quickly and efficiently, with high-quality results (if you know what you’re doing, that is. This is why it is so important to have a good knowledge of polygon modelling before learning to sculpt, as you need that understanding of edge flow and topology.
I’m going to pop a few tutorials I have found below that outline good sculpting workflows and work practices. If you’re hungry for more, please go to my ‘Sculpting Techniques’ Pinterest board here:
The video below is a fantastic introduction to sculpting techniques in ZBrush, covering cross-hatching, smoothing brushes, the standard brush, and edge polish (unrelated, but the edge polish tool is good for hard-surface sculpting too!). On top of all of those tools, he covers much more as well!
Another important thing to remember when sculpting is that you don’t need to rush into high subdivision levels. It’s important to start by blocking out big shapes and forms at a lower subdivision level, working your way up to smaller forms and details. Otherwise, you may lose a lot of your definition. It’s just a good habit to get into. 🙂
Well, that will do us for this post, I think. Remember to check out my sculpting Pinterest board for more tips and tricks!
I have a long way to go before I reach my 3d-modelling dreams. If I want to get better, I need to do a lot of research and study hard. I can’t improve by making the same mistakes over and over again!
Since I am focusing on environment design and modelling this trimester, I thought it would be beneficial to do a big amount of research early on and compile it all here for later reference. I feel very overwhelmed this trimester (I’m so close to the end of my course now) and I need to ‘bury my head in the books’ for a while in order to (hopefully) feel like I know what I am doing soon.
Let’s get into it!
Ahh, Firewatch. An edge-of-your-seat tale of two lonely adults seeking friendship out in the woods. Hilarity ensues. Not really, I lied. It’s heart-breaking.
Anyway, this game has touched me deeply to the point where I have been obsessed with watching behind-the-scenes talks and public presentations. I would like to first discuss what I know of the work that went into creating the atmospheric world of Firewatch.
Firewatch‘s Environment Pipeline (to the best of my knowledge)
Concept art!
The early days of a 3d environment’s lifespan are barely more than a collection of scribbles. Slowly the pieces get more and more defined, coming together cohesively, as if they could all drawn in-person in a real-life environment. The goal is to achieve environment designs that are so consistent, the rest of the production team can ‘see’ how the final environment will look in its entirety. Concept art is also created for individual assets so that the modelers may create them in 3D.
Asset production (many assets being modular in this case!) Firewatch feigns being an open-world environment. The technology behind the game isn’t truly open-world, it’s quite linear in fact, but I’ll talk about that later. You’re probably thinking, “How did they create so many trees?!” The answer is, they didn’t! Jane Ng, Firewatch’s lead designer stated that her work on the game featured a large amount of copy-pasting. What that means is that, in the case of trees, grass, rocks and other foliage at least, the original assets were copied thousands of times!
“I didn’t notice trees repeating when I was playing the game, though.” That’s because Jane didn’t want you too. Jane worked out the exact number of trees that she had to create in order to avoid the player getting wise of the repetition. Just enough trees to avoid suspicion, and not so many that cause the project more time than necessary. In Janes own words, “Ïf you can get away with 23 trees, don’t make 25.”
Greyboxing This step usually occurs alongside asset production. ‘Greyboxing’ an environment is exactly what you’d expect, it’s using a heap of grey 3d boxes (or other primitive objects) to map out what the final landscape/architecture/asset-placement will look like. Firewatch did this a little differently, however. They tried grey boxing, but it just wasn’t working for them. The level designers ended up creating rough, early version landscape sculpts instead. This is a good example of how standard environment workflows can be tweaked if they aren’t fully suited to your project.
Final landscape and asset placement Level designers and environment artists unite! This is the step where things truly start to take on their ‘final look’. For Firewatch this step consisted of mostly copy-pasting trees and foliage, but they also had some super cool architecture/items to place as well, such as the fire tower itself.
Lighting
The final step to setting up any environment is ensuring that your scene lighting is interesting, and in the case of video game design, the lighting must also aid the player on their journey. For example, in the environment below, they player is being naturally directed through the world toward a light source.
Firewatch’s skybox played a huge role in getting the games ‘lighting-feel’. If you’d like to read up on the tech behind it, follow the link here.
So that’s your standard environment pipeline, straight from Firewatch. they tweaked it a little bit, adding some innovative tech (the skybox, seriously. it’s cool) and unusual techniques. If you want to delve even deeper into how Firewatch’s environment, in particular, was created, they presented a brilliant talk at GDC this year. It’s an hour long but totally worth it.
How have I put this research into practice?
I really resonated with Jane Ng’s modular philosophy. It helps to significantly cut back on the time taken to get a project finished, and if you get into the ‘variation sweet-spot’, you can get away with making just the right amount of assets for no one to notice (or care).
I’m working on three different environments (so far) this trimester, so you better believe I am implementing modular techniques and workflows. So far I have created only a few modular assets, wall panels for a video-game, but I will be making heaps more this trimester.
I am in a chipper mood today and am ready to jump into the day. Why am I so happy? Because I just found this video:
WHO KNEW IT WAS SO EASY??
Apparently creating your own PBR materials in Quixel is much, much simpler than I thought it would be. In fact, I wasn’t even entirely sure you could do it. Substance Designer and Substance Painter are two separate programs, so I didn’t think that Quixel would be able to pull off the whole lot. Boy, was I pleasantly surprised!
The reason this is so important to me is because I am creating two PBR-textured environments in the Unreal engine, so I need to be able to create the materials that quixel is lacking (hurry up mega scans! Release already!!)
My first project is going to be PBR wood materials, I am super excited.
Anyway, please check out the video and have a wonderful day.
I am beginning work on a new project this week, where I am focusing on developing my environment creation skills. I’m focusing on environments in particular for the rest of this year, in fact.
I’d love to be creating work like this in the next five years. Some of the things below use hand-painted, stylized textures, where some of them use photo-real textures. I’d like to develop a great understanding of both, but for this project I’m going to be focusing on a photo-real look.
The quality standards of professionals, and therefore the quality standards that would be expected from me are impeccable. Have a long below to see the kind of works that industry professionals are busy creating.
So, let’s evaluate my current skill set up against the industry standard. I have only ever worked on one 3D environment to date, and a lot of it was not of my own design (being a group project). Needless to say, I have a long way to go. I require rapid skill development in this area as it has not been my focus for very long.
So, what do I need to learn and improve on to get myself to a professional standard?
Many, many things. Here are some examples of topics that I must research extensively in order to get to where I want to be in five years:
Environment pipelines, techniques and modular workflow.
Lighting
Hard surface modelling techniques
Organic modelling/sculpting techniques
PBR (Physically Based Rendering)
Texturing and Shaders
Photogrammetry
VR Environments
Particles and Environmental VFX
I know I have a lot of things to learn, so let’s set some short-term goals!
Create a photo-realistic earthship (a form of sustainable housing, check out some reference images below) 3D environment
Write at least five research blogs covering the topics above (min 700 words each)
Begin sculpting in ZBrush
Make all assets in scene PBR
My plan is to work off an already existing earthship floor plan. That should give me a good idea of the space from the get-go. 🙂
I’ve been doing some research on modelling vegetation for real-time video game engines today and wanted to share my findings with you.
First up is this in-depth tutorial for baking a grass texture, including wildflowers! Incredibly low on polygons, this is ideal for mountain-side vegetation, which I need to create for one of my current projects. I highly recommend this video!
Next up, how to model trees in 3DS Max with seamless textures created in Photoshop. This is an awesome tutorial series, but unfortunately is unfinished! The tutor demonstrates how to create everything but the foliage :(. I’ll have to find a tutorial for the leaves elsewhere. Another thing that this tutorial is lacking is how to create a realistic normal map for a tree trunk, but hopefully I can work that out, too.
This one isn’t so much a tutorial to create something, more it is a tutorial to use a particle effect in Unreal. This market place item cost about $4.50 and will allow you to spawn awesome looking leaves that will float down from your trees. You also get tonnes of control over how they look and move, and it includes LOD’s for maximum performance control. With a bit of effort however, I’m sure you could create your own script to do it for you (using blueprint in Unreal engine, for example) for free!
How to spawn procedural foliage in Unreal engine. Thank GOD I found this, because I was about to try covering large spaces of land tree-by-tree. This is sooo much better!
Adding wind to foliage in Unreal engine! I had no idea how to achieve this so this is incredibly helpful. ‘Simple Grass Wind’, use it!
Oh boy, and I just know this one is going to get a lot of use over the next couple of weeks. How to create realistic vines in 3DS Max, they look so good!
This one is my project for later today, to create a rose. This tutorial is a little too fast-paced with no vocal or text instruction given, but I should be able to work it out, I have to haha.
Okay, that is all for this post, I am exhausted from all this research! Time for a lunch break I think ;).


![ProEXR File Description =Attributes= BlenderMultiChannel (string): "Blender V2.55.1 and newer" Camera (string): "Camera" Date (string): "2016/03/02 23:20:07" File (string): "D:WORKphotoshop filesforest_alien_structureforest_alien_structure.blend" Frame (string): "001" RenderTime (string): "10:58.72" Scene (string): "Scene" Time (string): "00:00:00:01" channels (chlist) compression (compression): Zip16 dataWindow (box2i): [0, 0, 4095, 2047] displayWindow (box2i): [0, 0, 4095, 2047] lineOrder (lineOrder): Increasing Y pixelAspectRatio (float): 1.000000 screenWindowCenter (v2f): [0.000000, 0.000000] screenWindowWidth (float): 1.000000 =Channels= RenderLayer.AO.B (float) RenderLayer.AO.G (float) RenderLayer.AO.R (float) RenderLayer.Combined.A (float) RenderLayer.Combined.B (float) RenderLayer.Combined.G (float) RenderLayer.Combined.R (float) RenderLayer.Depth.Z (float) RenderLayer.Env.B (float) RenderLayer.Env.G (float) RenderLayer.Env.R (float) RenderLayer.IndexMA.X (float) RenderLayer.IndexOB.X (float) RenderLayer.Normal.X (float) RenderLayer.Normal.Y (float) RenderLayer.Normal.Z (float) RenderLayer.TransCol.B (float) RenderLayer.TransCol.G (float) RenderLayer.TransCol.R (float)](https://chehubbardartist.files.wordpress.com/2016/06/in_five_years_05.jpg?w=370&resize=370%2C185&h=185#038;h=185 "in_five_years_05")


